Posted on 10 February 2022, updated on 19 December 2023.
Kubernetes is a container orchestration tool that revolutionized the industry. But it's not a magic bullet: while it tries to keep services healthy and responsive, it can’t predict the actual status of containers. Is there a way to indicate their health statuses? Let’s try out Kubernetes probes!
What are Kubernetes probes?
Pod lifecycle
In Kubernetes, each pod has a PodStatus, which not only contains the pod phase (Pending, ContainerCreating, Running) but also contains an array of PodConditions, which are PodScheduled, ContainersReady, Initialized, and Ready. Each condition can be either True, False, or Unknown.
What’s interesting is that the Ready condition is used to determine whether the Pod can respond to requests and be included in matching Services. By default, it becomes true as soon as all containers within the pod are running, and stays true as long as the Pod is up.
A failing web app
Let’s study a Flask web server that “mysteriously” stops functioning properly after a while. You can find the source code, including Kubernetes config files, on GitHub.
Let’s have a look at the app’s source code:
# app.py
from flask import Flask, render_template
from random import randrange
from os import environ as env

app = Flask(__name__)
healthy = True


def update_health():
    global healthy
    if randrange(10) == 7:
        healthy = False
    return healthy


@app.route("/")
def hello_world():
    if update_health():
        return render_template(
            "index.html", pod_name=env.get("POD_NAME", "somewhere")
        )


@app.route("/healthz")
def healthz():
    if update_health():
        return "OK"
As you can see, every time a page is requested, there is a 10% chance for the healthy variable to be set to False, which leads to Internal Server Errors on every subsequent request. Basically, the app stops working after a while.
Try cloning the repository and applying the Deployment and Service manifests on a local Kubernetes cluster, such as Minikube or Kind.
$ kubectl apply -f kubernetes/deployment.yaml
$ kubectl apply -f kubernetes/service.yaml
When accessing the service and refreshing many times, we can notice that more and more containers return Internal Server Errors. If we do it a lot, no Pod provides correct responses anymore.

Our web app starts to fail after some refreshes
If only there was a way for Kubernetes to know when containers are not functioning properly... 🤔
Probes to the rescue!
Kubernetes allows us to set up probes, which are health checks that can monitor a container’s status: they’re basically the container equivalent of a dead man’s switch.
Kubelet can periodically run an action, such as an HTTP GET request to a given path, and modify the container’s state based on the result.
How could we use probes for our web app? Let’s take a look at what kinds of probes exist.
Three kinds of probes
Kubernetes provides three different probe types, each with its own behavior.
Liveness probe
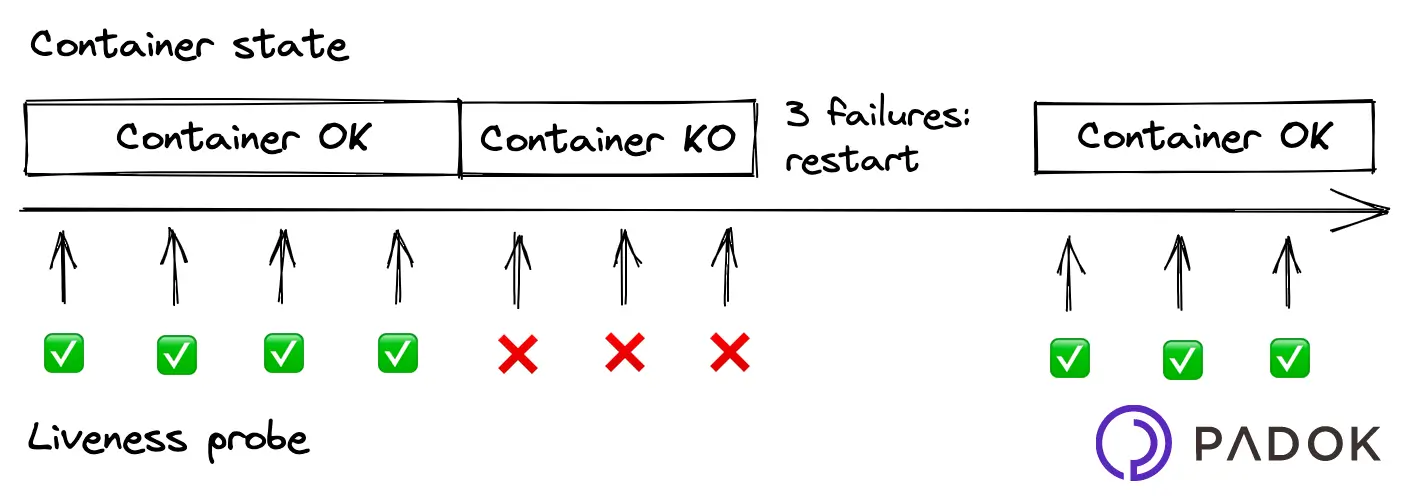
A liveness probe detects if the container is properly running and, if the failure threshold has been reached, kills the container. In most cases, depending on the container’s restart policy, Kubernetes will automatically restart the failed container. We might want to use a liveness probe for a container that can fail with no possible recovery.

Readiness probe
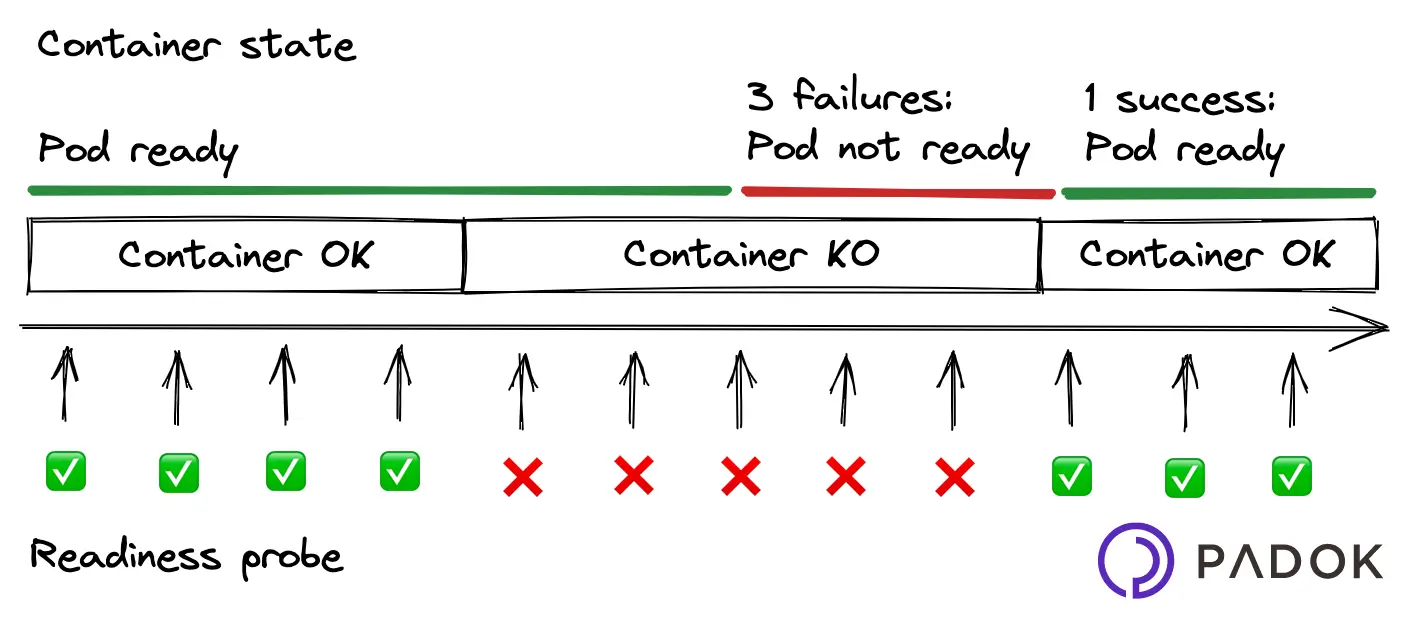
A readiness probe checks if the container can respond to new requests. Unlike a liveness probe, a readiness probe doesn’t kill the container. Kubernetes simply hides the container’s Pod from corresponding Services, so that no traffic is redirected to it. As an example, a web service that occasionally runs large, expensive jobs might slow down, so we would want our readiness probe to check if such an operation is in progress.

Startup probe
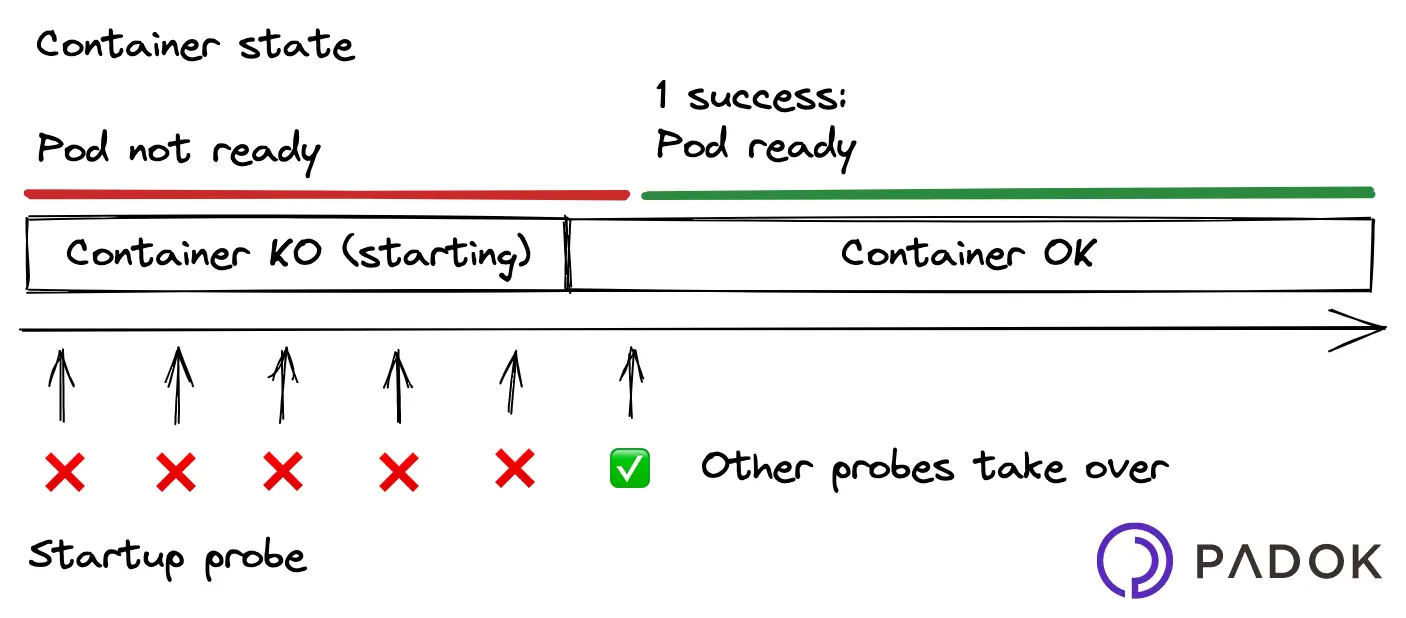
A startup probe checks if the container has properly started. It has higher priority over the two other probe types, which are disabled by Kubernetes until the startup probe is successful, at which point they take over. Startup probes are useful in situations where your app can take a long time to start, or could occasionally fail on startup.

🔧 Probes have common settings:
initialDelaySeconds: how many seconds should pass before probes should be activeperiodSeconds: the probing frequencytimeoutSeconds: the number of seconds after which the probe times outsuccessThreshold: how many times should the probe succeed before the container should be seen as healthyfailureThreshold: how many times should the probe fail before the container should be seen as failing
As we can see here, while there are common settings, various Kubernetes probe types have different behaviors and, as a result, different use cases.
How do I implement probes?
Let’s go back to our web app example. Based on what we’ve learned, which type of probe would you use?
In our case, a liveness probe is the most appropriate, because we cannot recover from a failing state: the only solution is for Kubernetes to restart a container as soon as it fails. Let’s edit our deployment.yaml file in order to set up a liveness probe in our containers, by adding the following code to our Kubernetes container spec template.
# kubernetes/deployment.yaml
spec:
# ...
  template:
  # ...
    spec:
      containers:
        - name: web-app
          # ...
          livenessProbe:
            initialDelaySeconds: 5
            periodSeconds: 5
            httpGet:
              scheme: HTTP
              path: /healthz
              port: 5000
The full code is available on the with-liveness-probe branch of the repo
We have configured our liveness probe to start checking our app’s health status five seconds after its launch, then every five seconds. It is checked by sending a HTTP GET request to /healthz on port 5000. By default, failureThreshold equals 3, and successThreshold equals 1: the probe must receive three errors before the container should be considered failing and restarted by Kubernetes, then a single successful probe sets the health state back to normal.
Use kubectl to see your pods. Notice how Kubernetes restarts them every once in a while when the app stops working. Your liveness probe is working!

Notice the restart count on our pods.
Conclusion
In this article, you have learned to implement a probe in your Kubernetes resources to check on containers’ health. Probes are really powerful yet often neglected tools that can maximize your app’s availability. We have only used HTTP GET requests, but probes can also execute commands in your container, open TCP sockets, and perform gRPC calls.
What’s more, parameters can be fine-tuned to fit your needs as best as possible. Once you’ve made your app failure-resistant, why not try to set up horizontal pod scaling to further improve availability?

